If you love creamy and cheesy dishes, you’ve found the right recipe! My Cheesy Cauliflower Au Gratin will make your taste buds dance. This twist on a classic dish is packed with flavor and easy to whip up. With just a head of cauliflower and a handful of tasty ingredients, you can create a meal that everyone will enjoy. Ready to impress your family and friends? Let’s get cooking!
Why I Love This Recipe
- Comforting Flavor: This Cheesy Cauliflower Au Gratin combines the rich, creamy textures of cheese with the subtle nuttiness of cauliflower, creating a dish that’s both comforting and indulgent.
- Easy Preparation: With simple steps and easily accessible ingredients, this recipe is perfect for a weeknight dinner or a special occasion, making it a go-to for any home cook.
- Versatile Side Dish: Whether served alongside roasted meats, grilled chicken, or as a vegetarian option, this dish complements any main course beautifully.
- Customizable Toppings: The option to add breadcrumbs for a crunchy topping or experiment with different cheeses makes this recipe adaptable to your personal taste.
Ingredients
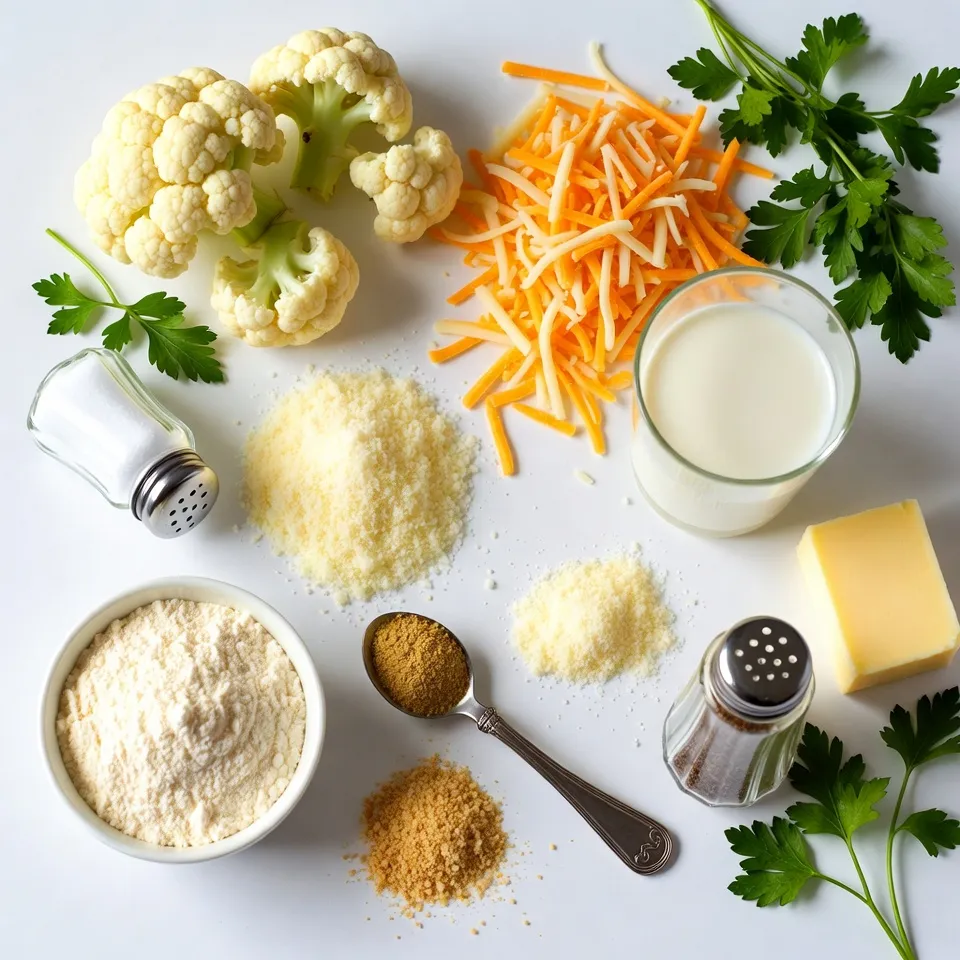
List of Ingredients
– Large head of cauliflower
– Sharp cheddar cheese
– Grated Parmesan cheese
– Unsalted butter
– All-purpose flour
– Whole milk
– Garlic powder
– Onion powder
– Salt and pepper
– Breadcrumbs (optional)
– Fresh parsley (for garnish)
Cheesy Cauliflower Au Gratin starts with fresh, simple ingredients. I love using a large head of cauliflower, as it gives a great base. The sharp cheddar cheese adds a rich taste that melts beautifully. Grated Parmesan cheese brings a nice nutty flavor that complements the cheddar.
You will need unsalted butter and all-purpose flour to create the roux, which is key for a smooth sauce. Whole milk makes the cheese sauce creamy and rich. Garlic powder and onion powder add depth to the flavor. Don’t forget salt and pepper, as they really enhance everything.
If you like some crunch, add breadcrumbs on top. Fresh parsley makes a lovely garnish, adding color and freshness. These ingredients come together to create a dish that is both cheesy and satisfying.
Step-by-Step Instructions
Preparation Steps
– Preheat the oven: Start by preheating your oven to 375°F (190°C). This step is vital for crisping the top later.
– Blanch the cauliflower: In a large pot, bring salted water to a boil. Add your cauliflower florets and blanch them for about 5-7 minutes. They should be tender but still firm. Drain them in a colander and let them cool a bit.
Making the Cheese Sauce
– Create the roux: In a medium saucepan, melt the butter over medium heat. When it bubbles, add the flour. Whisk this mixture for about 1 minute to cook the flour.
– Gradually whisk in milk: Slowly add the milk while whisking to prevent lumps. Keep stirring for 3-5 minutes until the sauce thickens and becomes creamy.
– Add seasonings and cheeses: Mix in garlic powder, onion powder, salt, and pepper to the sauce. Then stir in 1 ½ cups of sharp cheddar and ¾ cup of Parmesan. Make sure everything melts well and is smooth.
Final Assembly and Baking
– Combine cauliflower and cheese sauce: Gently fold the blanched cauliflower into the cheese sauce. Ensure each floret gets coated with that tasty mix.
– Pour into baking dish and top: Transfer the cheesy cauliflower mix to your greased baking dish. Sprinkle the remaining cheddar and Parmesan on top. For added crunch, you can sprinkle breadcrumbs over the cheese.
– Bake until golden brown: Place the dish in the preheated oven. Bake for 25-30 minutes until the top is golden brown and bubbly. This gives you that perfect crust.
Tips & Tricks
Perfecting the Recipe
– Achieving the right cauliflower texture: Start by blanching the cauliflower. Boil the florets for 5-7 minutes. You want them tender but not mushy. This keeps them firm after baking. Each piece should hold its shape in the dish.
– Ensuring a creamy cheese sauce: When you make the roux, whisk the butter and flour well. Cook it for about a minute until it bubbles. Then, slowly add the milk while whisking. This helps avoid lumps. Add your seasonings after the sauce thickens. Mix in the cheeses until fully melted for that rich, creamy texture.
Serving Suggestions
– Presentation tips for serving: Serve the Cheesy Cauliflower Au Gratin warm in the baking dish. This keeps it cozy and inviting. Garnish with fresh parsley on top for color. You can sprinkle some extra cheese if you like. This adds even more flavor.
– Pairing ideas with sides and drinks: This dish pairs well with a simple salad or crusty bread. A light white wine or sparkling water can complement the rich flavors. If you want, add some roasted chicken for protein. This makes it a complete meal that everyone will love.
Pro Tips
- Use Fresh Cauliflower: For the best flavor and texture, always opt for fresh cauliflower. Look for heads that are firm, with tightly packed florets and vibrant green leaves.
- Customize Your Cheese: Feel free to mix different types of cheese such as Gruyère or Monterey Jack for a unique flavor profile. Just ensure to maintain the total cheese quantity.
- Make it Ahead: You can prepare the cheesy sauce and blanch the cauliflower a day in advance. Just assemble and bake when you’re ready to serve.
- Perfect Browning: For an extra crispy top, broil the dish for the last 2-3 minutes of baking, watching closely to prevent burning.
Variations
Ingredient Substitutions
You can easily switch up the cheeses in this dish. Try using mozzarella for a milder taste. Gruyère adds a nutty flavor that works well too. If you want a sharp kick, go with a pepper jack cheese. You can also use vegan cheese to make this dish dairy-free.
If you need a gluten-free option, replace the all-purpose flour with cornstarch. Mix 2 tablespoons of cornstarch with a bit of cold milk before adding it to the sauce. This keeps the creamy texture without the gluten.
Flavor Additions
For extra flavor, add spices like paprika or cayenne pepper. A sprinkle of nutmeg can also enhance the dish’s warmth. Fresh herbs like thyme or rosemary can bring a new twist to your au gratin.
Want to make it heartier? Add cooked chicken or crispy bacon bits. You can also mix in vegetables like spinach or mushrooms. These additions can boost the flavor and nutrition of your cheesy cauliflower au gratin.
Storage Info
How to Store Leftovers
To keep your Cheesy Cauliflower Au Gratin fresh, store leftovers properly. Place them in an airtight container. This will keep the flavors intact. Refrigerate the dish right after it cools. It’s best to eat leftovers within 3-4 days.
If you want to store it longer, freezing works well too. Use a freezer-safe container or a heavy-duty freezer bag. Make sure to remove as much air as possible. You can freeze it for up to 2 months. Just remember to label the container with the date.
Reheating Instructions
Reheating your Cheesy Cauliflower Au Gratin is easy. The best method is to use the oven. Preheat it to 350°F (175°C). Place your dish in the oven for about 15-20 minutes. This will warm it through without making it soggy.
You can also use the microwave if you’re in a hurry. But, cover it loosely with a paper towel. This helps keep some moisture in while you heat it. Heat in short bursts of 1-2 minutes. Stir between bursts to avoid hot spots.
Avoid sogginess by not adding extra liquid when reheating. If the cheese sauce seems thick, add a tiny splash of milk. This keeps it creamy without losing the great texture.
FAQs
What can I use instead of milk?
You can use almond milk or soy milk. They add creaminess without dairy. For a richer taste, try heavy cream or half-and-half. Each option changes the flavor a bit.
How do I keep my cheese sauce smooth?
To keep your sauce smooth, whisk it well while cooking. Add the milk slowly to avoid lumps. If you see lumps, strain the sauce before adding the cheese.
Can I make this recipe ahead of time?
Yes, you can prepare the dish a day before. Just store it in the fridge. When ready to bake, let it sit out for 30 minutes. Then bake as directed.
Can I use frozen cauliflower instead?
Yes, frozen cauliflower works well. Thaw it first and drain any extra water. This helps keep the texture right.
What can I serve it with?
Cheesy cauliflower au gratin pairs well with grilled chicken or steak. It also works great as a side for roast beef. Serve it with a crisp salad or warm bread for a full meal.
This blog post covered everything you need for a tasty cauliflower cheese bake. We talked about the main ingredients like cheddar and Parmesan, plus how to make the cheese sauce. I shared tips for a perfect dish and ways to switch up the recipe.
Remember, this bake can impress at any meal. Use the tips, have fun with it, and enjo