Looking for a sweet treat that brings joy with every bite? You’ve come to the right place! In this post, I’ll show you how to make Chocolate Marshmallow Fudge—an easy and delicious dessert that impresses everyone. With a perfect mix of creamy chocolate and fluffy marshmallows, this treat is hard to resist. Get ready to satisfy your sweet tooth as we dive into the delightful world of fudge!
Why I Love This Recipe
- Decadent Flavor: The combination of semi-sweet chocolate and marshmallows creates a rich, satisfying treat that’s hard to resist.
- Easy to Make: This fudge requires minimal effort and time, making it a perfect dessert for any occasion.
- Customizable: Add your favorite nuts or experiment with different flavors to create a unique fudge tailored to your tastes.
- Perfect for Sharing: Cut into squares, this fudge is great for parties, gatherings, or as a thoughtful homemade gift.
Ingredients
List of Ingredients
To make Chocolate Marshmallow Fudge, you will need:
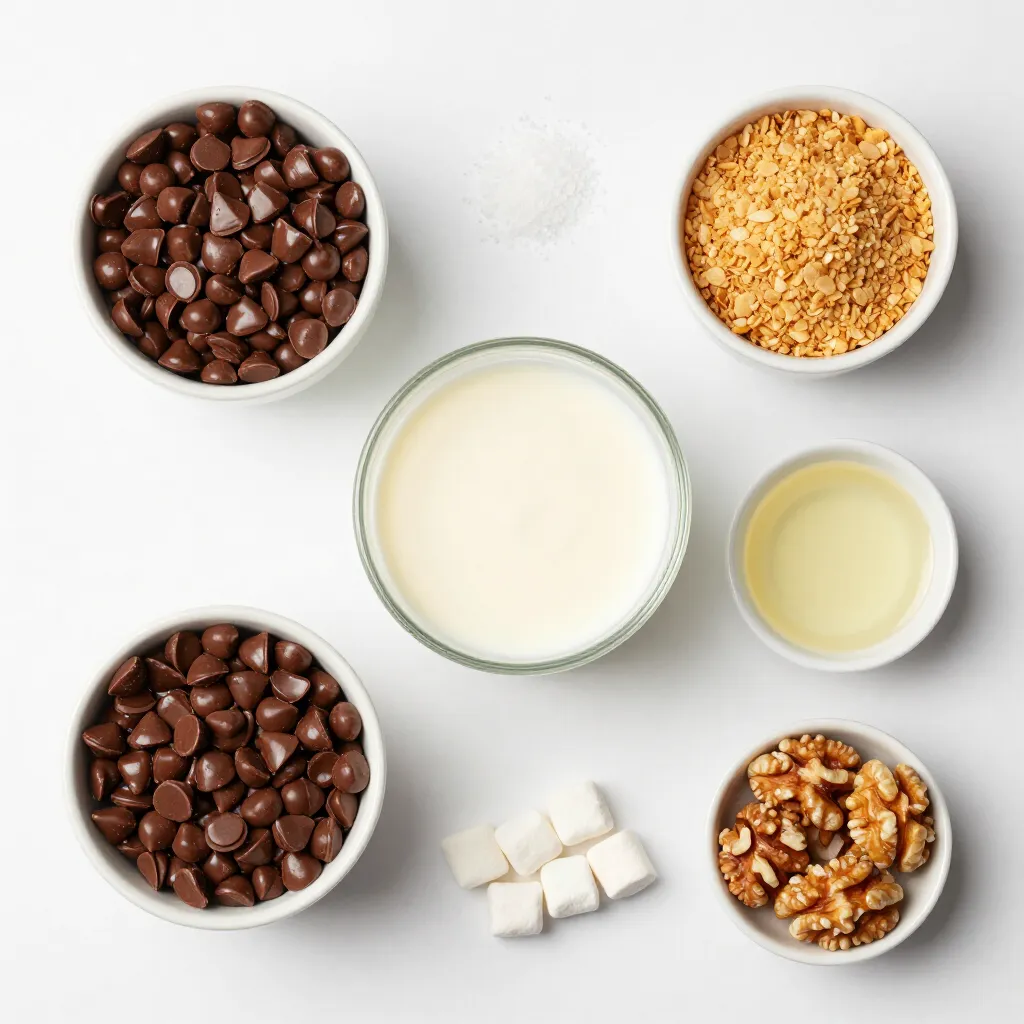
– 2 cups semi-sweet chocolate chips
– 1 cup sweetened condensed milk
– 1 cup mini marshmallows
– ½ cup crushed graham crackers
– 1 teaspoon vanilla extract
– ¼ teaspoon salt
Optional Ingredients
You can add extra flavor and crunch with these:
– ½ cup chopped nuts (such as walnuts or almonds)
Ingredient Substitutions
If you don’t have something on hand, here are some swaps:
– Use dark chocolate chips for a richer taste.
– Try evaporated milk instead of sweetened condensed milk for a lighter fudge.
– You can replace mini marshmallows with regular marshmallows, just cut them smaller.
– Swap graham crackers with crushed cookies for a fun twist.
Step-by-Step Instructions
Preparation Steps
– First, line an 8×8-inch baking dish with parchment paper.
– Leave an overhang on two sides. This helps you lift the fudge later.
Cooking Process
– In a medium saucepan, mix the semi-sweet chocolate chips and sweetened condensed milk.
– Place the saucepan on medium-low heat. Stir continuously with a spatula.
– Wait until the chocolate chips melt and the mix looks smooth and glossy.
– Remove the saucepan from heat. Stir in the vanilla extract and salt.
– Fold in the mini marshmallows and crushed graham crackers.
– If you want nuts, add them now. Mix gently until all is combined.
– Pour the fudge mix into the lined baking dish.
– Use a spatula to spread it evenly, filling all corners.
– Chill in the fridge for at least 3 hours. It should feel firm when done.
– Once set, lift the fudge out using the parchment paper.
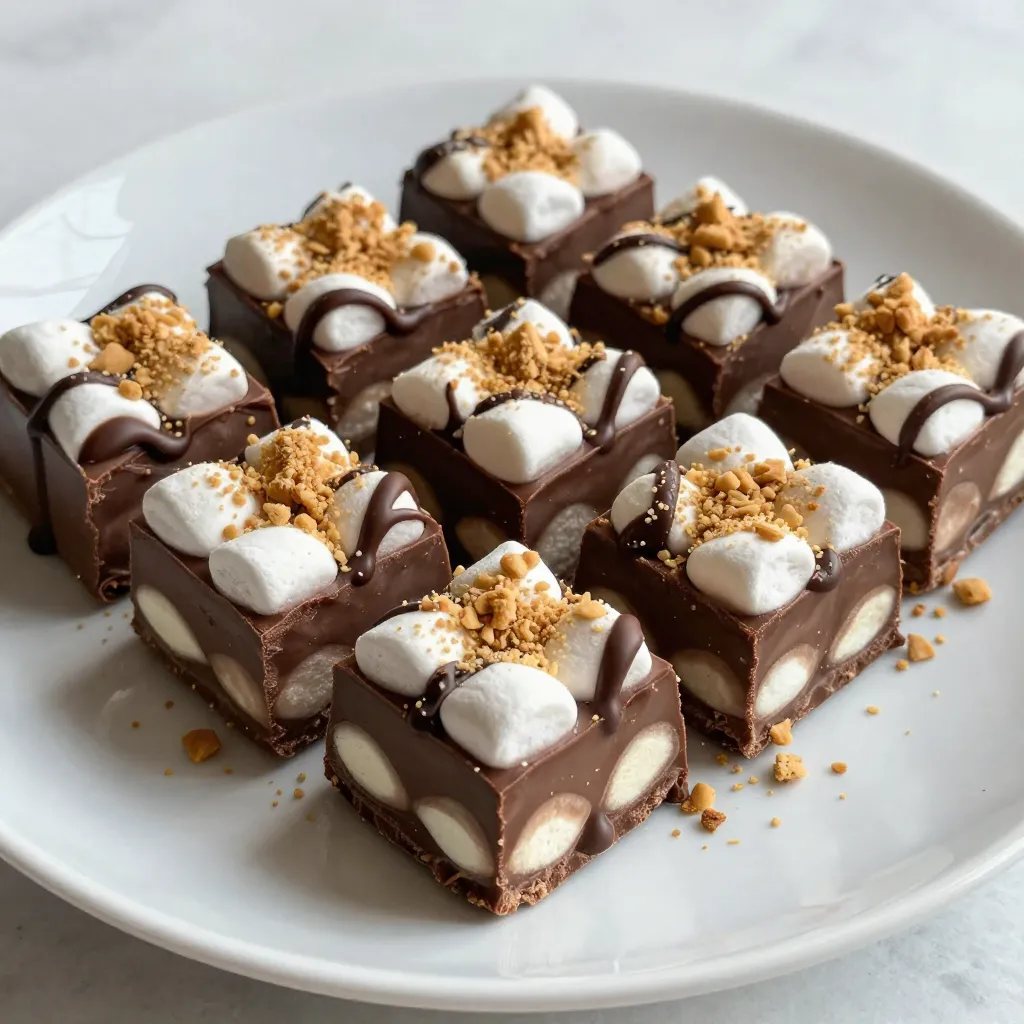
– Cut it into 16 squares or your preferred size.
Tips for Achieving the Perfect Texture
– Stir continuously while melting. This helps prevent burning and ensures a smooth mix.
– Use mini marshmallows for the best texture. They blend well and give a nice bite.
– Chill the fudge long enough to set; this helps it hold its shape.
– For a lovely finish, sprinkle extra crushed graham crackers on top before serving.
– Drizzling melted chocolate over the fudge adds flair and taste.
Tips & Tricks
Common Mistakes to Avoid
When making chocolate marshmallow fudge, avoid these common mistakes:
– Don’t rush the melting process. Heat the chocolate slowly.
– Stir continuously while melting to prevent burning.
– Make sure to fold in the marshmallows gently. This keeps them whole.
– Don’t skip lining the baking dish. It helps with easy removal.
– Allow the fudge to set fully in the fridge. This ensures the right texture.
Serving Suggestions
Serving your fudge can be fun and creative. Try these ideas:
– Cut the fudge into fun shapes with cookie cutters.
– Arrange squares on a colorful plate for a festive look.
– Add a sprinkle of crushed graham crackers on top. This adds texture and flair.
– Serve with a scoop of vanilla ice cream for a treat.
– Drizzle melted chocolate over the fudge before serving. It looks amazing!
How to Store Leftover Fudge
Storing leftover fudge is easy. Follow these steps:
– Place fudge squares in an airtight container. This keeps them fresh.
– You can store it at room temperature for up to a week.
– For longer storage, put the fudge in the fridge. It lasts up to two weeks there.
– If you want to keep it longer, freeze the fudge. Wrap each piece in plastic wrap first.
– To enjoy frozen fudge, let it thaw in the fridge overnight.
Pro Tips
- Use Quality Chocolate: The flavor of your fudge heavily relies on the quality of the chocolate chips. Opting for high-quality semi-sweet chocolate will enhance the overall taste and texture.
- Chill Properly: For the best texture, ensure the fudge is chilled for the full 3 hours. This allows it to set properly, making it easier to cut into perfect squares.
- Customize Your Nuts: Feel free to experiment with different types of nuts, like pecans or hazelnuts, to add unique flavors and textures to your fudge.
- Presentation Matters: Enhance the visual appeal by garnishing with a sprinkle of crushed graham crackers or a drizzle of melted chocolate before serving.
Variations
Nutty Chocolate Marshmallow Fudge
You can add a crunchy twist to your fudge. Simply mix in ½ cup of chopped nuts. I love using walnuts or almonds. They add great texture and flavor. Just fold them in after melting the chocolate. This nutty touch makes each bite even more delightful!
Using Different Types of Chocolate
Feel free to switch up the chocolate types. You can use dark chocolate for a richer taste. Milk chocolate offers a sweeter flavor. Or try white chocolate for a fun twist. Just keep the same amount of chocolate chips. Each type brings a new flavor to your fudge!
Adding Flavor Enhancements
You can boost the taste of your fudge with simple changes. Try adding a splash of peppermint extract for a minty kick. A dash of espresso powder gives a coffee flavor that pairs well with chocolate. You can also mix in a bit of orange zest for a citrusy note. These enhancements will surprise your taste buds!
Storage Info
Short-term Storage Methods
Store your chocolate marshmallow fudge in an airtight container. This helps keep it fresh. You can place it in the fridge for up to one week. If you prefer, cut the fudge into squares before storing. This makes it easy to grab a piece whenever you crave a sweet treat.
Long-term Freezing Tips
To freeze fudge, first wrap it tightly in plastic wrap. Then, place it in a freezer-safe bag or container. This extra layer protects it from freezer burn. You can freeze the fudge for up to three months. When you’re ready to enjoy it, let it thaw in the fridge overnight.
How to Revive Stale Fudge
If your fudge becomes stale, don’t worry! You can soften it. Place the fudge in a microwave-safe bowl. Heat it in short bursts, about 10 seconds at a time. Stir in between bursts until it’s soft again. You can also add a bit of sweetened condensed milk to help it regain a creamy texture.
FAQs
How do I know when the fudge has set?
You can tell if the fudge is set by gently pressing it. If it feels firm and holds its shape, it is ready. After chilling for at least 3 hours, you can also check the edges. They should pull away from the sides of the pan slightly. This is a good sign that your fudge is ready to be cut.
Can I use regular marshmallows instead of mini?
Yes, you can use regular marshmallows. Just cut them into smaller pieces. This will help them mix better into the fudge. Keep in mind that mini marshmallows melt quickly and blend smoothly. So, the texture may change a bit when using regular marshmallows.
How do I cut fudge neatly?
To cut fudge neatly, first, make sure it is fully set. Lift the fudge out using the parchment paper. Use a sharp knife that has been warmed in hot water. This makes cutting easier. Wipe the knife after each cut for clean edges. This way, you’ll get perfect squares every time.
You learned about fudge ingredients, step-by-step cooking, and storage tips. We covered common mistakes and how to make tasty variations. With these insights, you can create perfect fudge every time. Remember to experiment with flavors and store your fudge properly. Keep practicing to master your fudge-making skills. Enjoy sharing your sweet creations with friends and famil