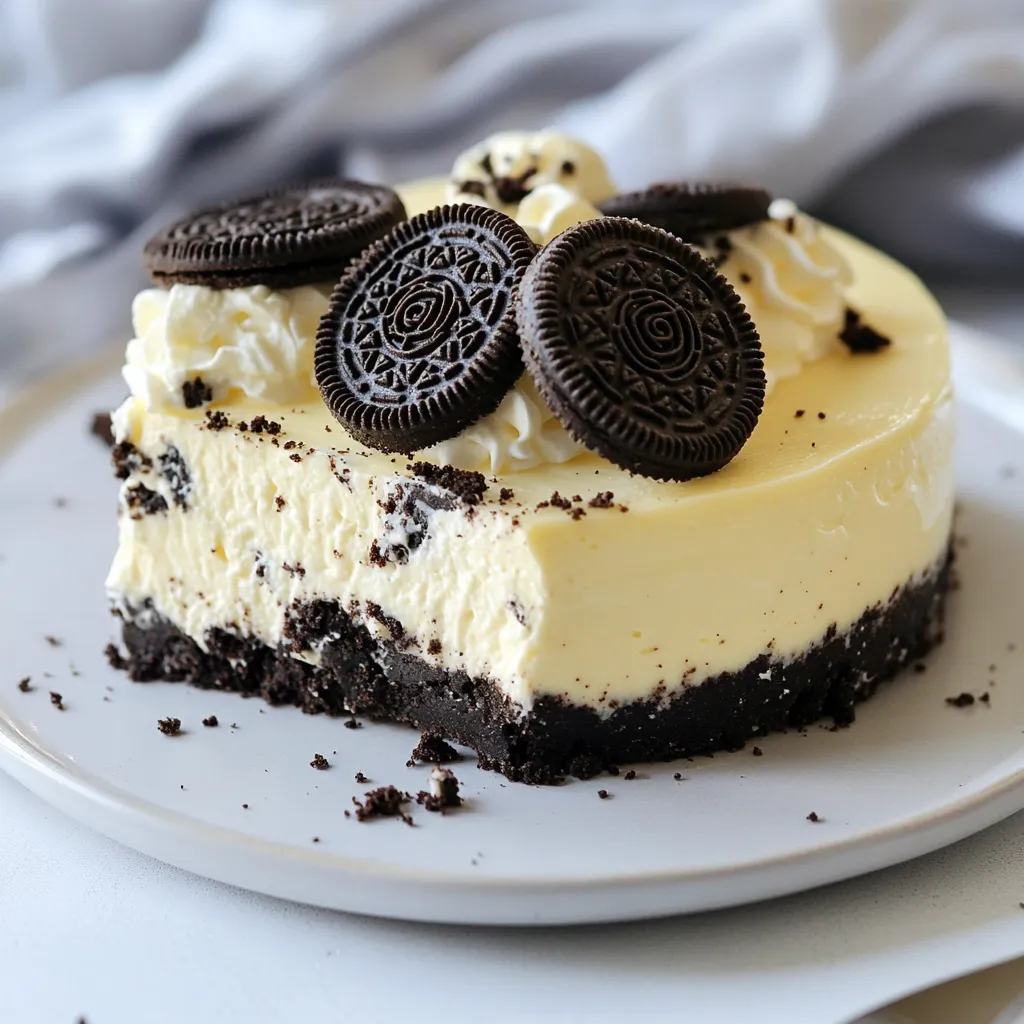
If you’re craving a sweet treat that’s easy to make, you’ve come to the right place! Our No Bake Oreo Cheesecake is a delightful dessert that requires no baking, just some simple mixing and chilling. Packed with creamy goodness and Oreo flavor, this cheesecake will impress your friends and family. Ready to create a dessert that’s quick, fun, and oh-so-delicious? Let’s dive into the recipe and bring this treat to life!
Why I Love This Recipe
- Effortless Preparation: This cheesecake requires no baking, making it a perfect choice for a quick and easy dessert that anyone can master.
- Decadent Flavor: The combination of rich cream cheese and chocolatey Oreo cookies creates a deliciously indulgent treat that chocolate lovers will adore.
- Customizable: You can easily modify this recipe by adding your favorite toppings, like whipped cream or chocolate sauce, to suit your taste.
- Perfect for Any Occasion: This no-bake cheesecake is ideal for celebrations, gatherings, or simply as a delightful end to a weeknight meal.
Ingredients
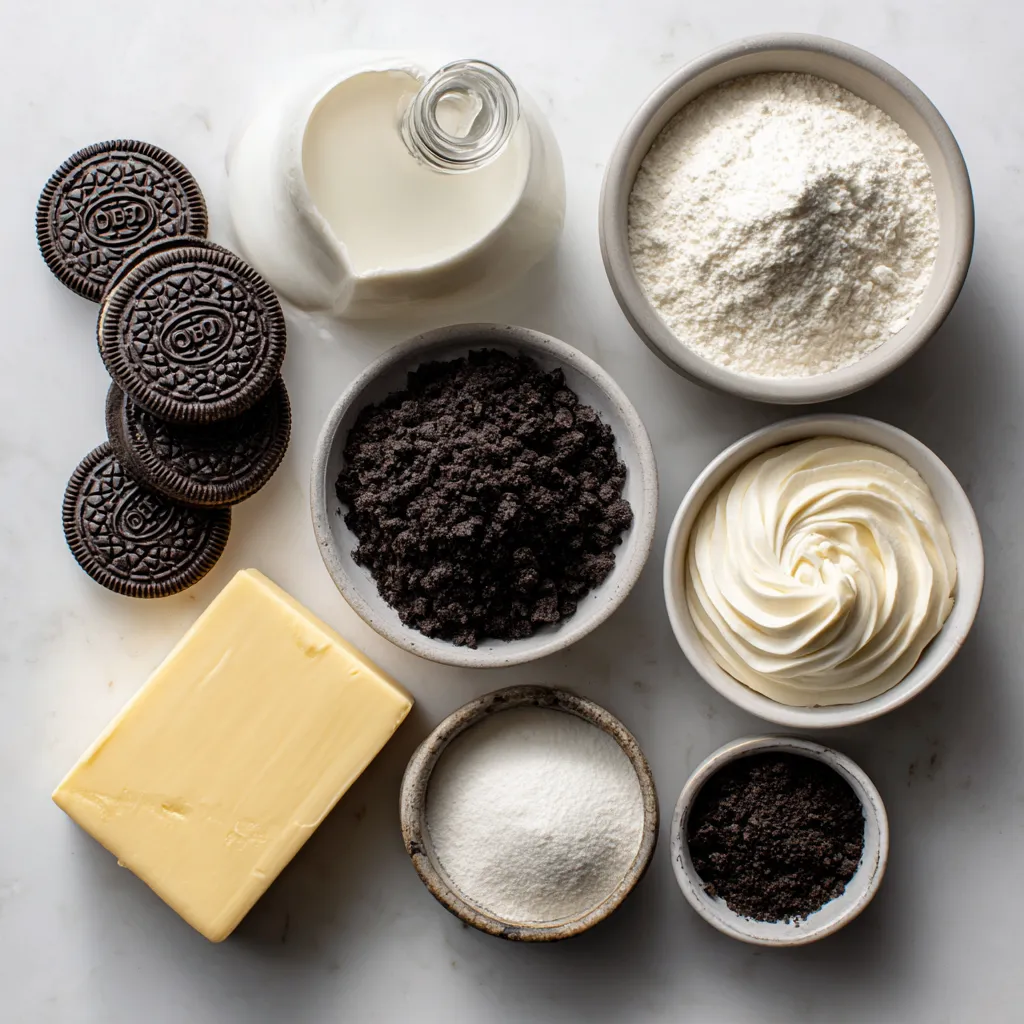
Main Ingredients for No Bake Oreo Cheesecake
– 24 Oreo cookies
– 1/2 cup unsalted butter
– 16 oz cream cheese
– 1/2 cup powdered sugar
– 1 teaspoon pure vanilla extract
– 2 cups heavy whipping cream
– 1/4 cup Oreo cookie crumbs
I love using these simple ingredients to create a rich and creamy dessert. The Oreo cookies give the crust and filling a wonderful flavor. First, we use 24 Oreo cookies. These will make a delicious, crunchy base. The butter holds the crumbs together. Melt 1/2 cup of unsalted butter before mixing it with the cookie crumbs.
Next, for the filling, we need 16 oz of cream cheese. Make sure it is softened. This helps it blend well. We add 1/2 cup of powdered sugar for sweetness. A teaspoon of pure vanilla extract adds a lovely aroma.
To make the cheesecake fluffy, we whip 2 cups of heavy whipping cream. This gives the dessert a light texture. Finally, we fold in 1/4 cup of Oreo cookie crumbs into the filling for extra flavor.
These ingredients come together to create a delightful treat that everyone will love!
Step-by-Step Instructions
Preparing the Oreo Crust
1. Crushing the Oreo cookies: Start by placing 24 Oreo cookies into a food processor. Pulse until they become fine crumbs. This step ensures a smooth crust.
2. Mixing with melted butter: In a large mixing bowl, combine the cookie crumbs with 1/2 cup of melted unsalted butter. Stir until the mixture looks like wet sand.
3. Pressing into the springform pan: Firmly press the Oreo mixture into the bottom of a 9-inch springform pan. Use the back of a measuring cup to make it even. Place the pan in the fridge while you prepare the filling.
Making the Cheesecake Filling
1. Beating cream cheese until smooth: In a large bowl, beat 16 oz of softened cream cheese with an electric mixer. Mix until smooth, about 2-3 minutes.
2. Incorporating powdered sugar and vanilla: Gradually add 1/2 cup of powdered sugar and 1 teaspoon of pure vanilla extract. Continue mixing until fully blended and no lumps remain.
3. Whipping the heavy cream: In a separate chilled bowl, pour in 2 cups of heavy whipping cream. Whip it with an electric mixer until stiff peaks form, which usually takes around 3-5 minutes.
Mixing and Refrigerating
1. Folding whipped cream into mixture: Carefully fold the whipped cream into the cream cheese mixture. Use a spatula and be gentle to keep the whipped cream light and airy.
2. Adding Oreo cookie crumbs: Gently fold in 1/4 cup of Oreo cookie crumbs. This adds flavor and texture to the filling.
3. Filling the crust with cheesecake mixture: Pour the creamy cheesecake filling over the chilled Oreo crust. Use a spatula to smooth the top evenly.
4. Chilling the cheesecake: Cover the cheesecake with plastic wrap or a lid. Return it to the fridge and let it chill for at least 4 hours, or overnight for the best results.
Tips & Tricks
Achieving the Perfect Consistency
Softening cream cheese is key to a smooth filling. Take it out of the fridge first. Let it sit for about 30 minutes. This makes mixing much easier.
When you whip cream, aim for stiff peaks. Use a chilled bowl and beaters. This helps the cream whip faster. It takes about 3-5 minutes. Stiff peaks give the cheesecake a light, airy feel.
Enhancing Flavor and Presentation
Always choose high-quality ingredients. Great Oreos make a big difference. Use pure vanilla extract instead of imitation. Fresh ingredients really enhance the taste.
For a stunning look, add visual garnishes. You can top slices with whipped cream. A sprinkle of crushed Oreos or chocolate sauce adds flair. These little touches impress everyone.
Avoiding Common Pitfalls
To keep the crust from getting soggy, press it firmly. Make sure the Oreo mixture is well-combined with butter. Chill the crust while you make the filling.
When slicing, use a warm knife for clean cuts. Dip the knife in warm water, then dry it. This helps each slice look perfect. Enjoy your beautiful, tasty cheesecake!
Pro Tips
- Chill Your Tools: Before whipping the cream, chill your mixing bowl and beaters in the freezer for about 10 minutes. This helps the cream whip up faster and achieve a fluffier texture.
- Room Temperature Cream Cheese: Make sure your cream cheese is softened to room temperature. This will ensure a smoother filling without lumps, making it easier to incorporate with the whipped cream.
- Customizable Toppings: Feel free to get creative with toppings! Consider drizzling caramel or chocolate sauce, adding fresh berries, or even a sprinkle of sea salt for a delicious contrast.
- Overnight Chill: For the best flavor and texture, allow the cheesecake to chill overnight. This gives it time to set properly and enhances the overall taste.
Variations
Flavor Additions
You can spice up your no bake Oreo cheesecake in fun ways. Try mixing in chocolate or peanut butter for a rich twist. For chocolate, add melted chocolate or cocoa powder to the cream cheese mix. For peanut butter, fold in a smooth peanut butter before adding the whipped cream. Both flavors add creamy richness that is hard to resist!
You can also use fruit purées or extracts for a fresh taste. Adding strawberry or raspberry purée can brighten the cheesecake. Just mix it in gently with the cream cheese. You can use a few drops of almond or lemon extract for a unique flavor. The possibilities are endless!
Dietary Substitutes
If you need gluten-free options, choose gluten-free Oreo cookies. Many brands offer these, so you can still enjoy this treat. Just follow the same steps with the gluten-free cookies for the crust.
For vegan adaptations, use vegan cream cheese and coconut cream instead of heavy cream. This gives a creamy texture without dairy. Make sure to select vegan cookies for the crust. This way, everyone can enjoy a slice!
Alternate Garnishes
Garnishing your cheesecake can make it extra special. You can use different cookie toppings like crushed graham crackers or chocolate cookies. Each offers a unique crunch and flavor.
You can also drizzle chocolate or caramel sauce over the slices. This adds sweetness and a beautiful look to your dish. A sprinkle of crushed Oreos or a dollop of whipped cream can finish it off perfectly. These small touches make your cheesecake stand out!
Storage Info
Storing Leftovers
To store your cheesecake in the fridge, cover it well. Use plastic wrap or a lid. You want to keep the air out to avoid drying. If you have extra slices, place them in an airtight container. This keeps them fresh for later enjoyment.
You can also freeze your cheesecake. Wrap it tightly in plastic wrap and then foil. This helps prevent freezer burn. It lasts about three months in the freezer. When you’re ready to eat it, just thaw it in the fridge overnight.
Shelf Life
Your no-bake Oreo cheesecake lasts about 4 to 5 days in the fridge. Keep an eye on it to ensure it stays fresh. If it starts to smell off or changes color, it’s time to toss it. Mold is another sign it’s no longer good. Always trust your senses when deciding if it’s safe to eat.
Re-serving Tips
To defrost your frozen cheesecake, move it to the fridge. Let it sit there for several hours or overnight. This keeps it creamy and prevents it from getting watery.
When serving, enjoy it chilled. It tastes best cold. If you want, let it sit at room temperature for a few minutes before slicing. This makes cutting easier and keeps the texture just right.
FAQs
Can I use other cookies for the crust?
Yes, you can use other cookies. Graham crackers work great for a milder taste. Chocolate digestives add a rich flavor. Choose cookies that crush easily and complement the filling. Just keep the texture in mind.
How long does it take to set?
Chill the cheesecake for at least 4 hours. For best results, let it sit overnight. This helps it firm up and enhances the flavors. A longer chill time makes a big difference in taste and texture.
Can I make this cheesecake ahead of time?
Absolutely! This cheesecake is perfect for advance prep. You can make it up to two days ahead. Store it in the fridge, covered well. This way, you can enjoy it fresh without stress on serving day.
This no-bake Oreo cheesecake is simple and fun to make. You only need a few ingredients like Oreo cookies, cream cheese, and heavy cream. Following the steps carefully helps you get a smooth filling and a tasty crust. Remember, use fresh ingredients and take your time when mixing. Variations let you get creative too. Whether you try different flavors or adapt for dietary needs, the options are endless. Enjoy making this delicious dessert. It’s sure to impress and satisfy everyon