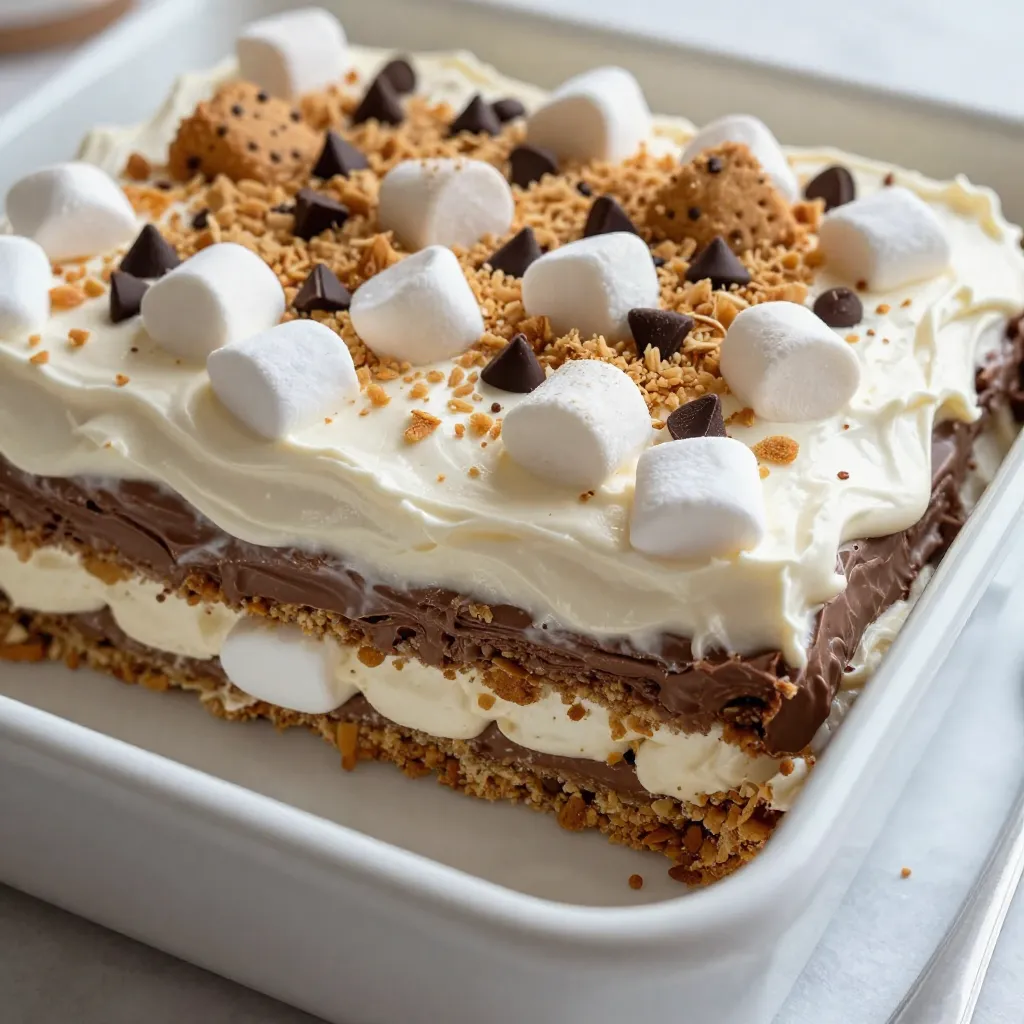
Looking for a sweet treat that’s easy to make? This S’mores Icebox Cake is your answer! It’s a no-bake dessert packed with the yummy flavors of classic s’mores. You’ll love how simple it is to prepare, using just a handful of ingredients. With my step-by-step guide, you’ll impress your friends and family in no time. Let’s dive in and create this delightful dessert together!
Why I Love This Recipe
- Easy to Assemble: This S’mores Icebox Cake requires no baking, making it a hassle-free dessert option perfect for any occasion.
- Layered Delight: The combination of graham crackers, whipped cream, and chocolate hazelnut spread creates a luscious layered treat that mimics traditional s’mores.
- Versatile Garnish: You can customize the toppings with chocolate chips and crushed graham crackers, adding your personal touch.
- Perfect for Gatherings: This cake serves a crowd, making it ideal for parties, picnics, or family gatherings and is sure to impress your guests!
Ingredients
Full List of Ingredients
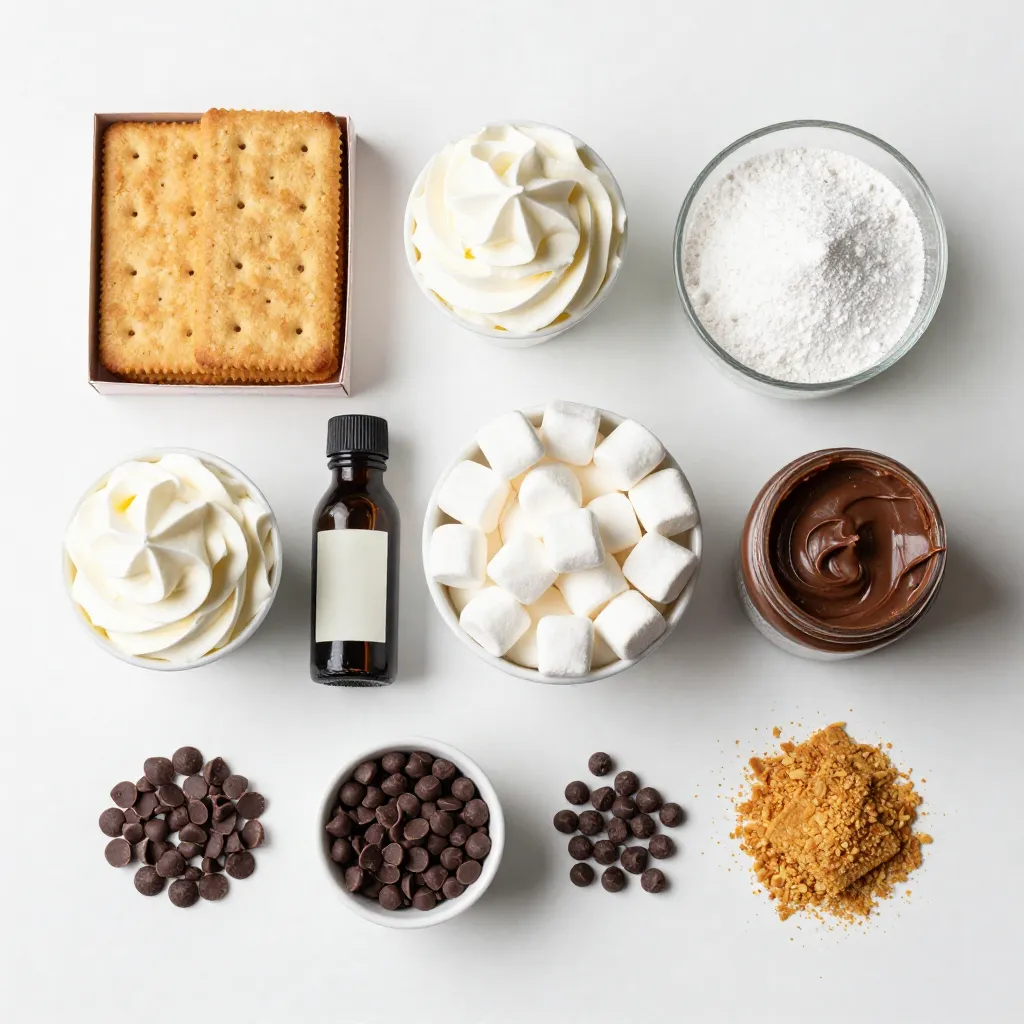
For the S’mores Icebox Cake, you will need:
– 1 box of graham crackers
– 2 cups heavy whipping cream
– 1 cup powdered sugar
– 1 teaspoon vanilla extract
– 1 cup mini marshmallows
– 1 cup chocolate hazelnut spread
– 1 cup chocolate chips
– 1/4 cup mini chocolate chips for garnish
– 1/4 cup crushed graham crackers for garnish
These ingredients create a rich, creamy dessert that captures the joy of s’mores.
Substitutions for Ingredients
If you need to swap some ingredients, here are a few ideas:
– Graham crackers: You can use digestive biscuits or vanilla wafers for a different flavor.
– Heavy whipping cream: Try using coconut cream for a dairy-free option.
– Powdered sugar: Granulated sugar works too; just blend it well.
– Chocolate hazelnut spread: Nut butter or chocolate spread can be good substitutes.
– Mini marshmallows: You can use regular marshmallows, just cut them into smaller pieces.
These substitutions keep the essence of the dessert while allowing for some flexibility.
Recommended Brand Recommendations
For the best results, I suggest these brands:
– Graham Crackers: Honey Maid offers a classic flavor and texture.
– Heavy Whipping Cream: Land O’Lakes is known for its rich creaminess.
– Powdered Sugar: Domino provides a fine, soft sugar ideal for desserts.
– Chocolate Hazelnut Spread: Nutella is the gold standard for its smooth taste.
– Chocolate Chips: Ghirardelli makes high-quality chocolate chips that melt well.
Using these brands can enhance your dessert’s taste and texture. Enjoy making this easy and delightful S’mores Icebox Cake!
Step-by-Step Instructions
Preparing the Whipped Cream
Start by gathering your ingredients. You will need heavy whipping cream, powdered sugar, and vanilla extract. In a large mixing bowl, combine these three ingredients. Use an electric mixer to beat them on high speed. Keep mixing until the cream thickens and soft peaks form. This should take about 3 to 5 minutes. Once you see those peaks, set the whipped cream aside. This fluffy layer is key to your S’mores Icebox Cake.
Constructing the Base Layer
Next, grab a 9×13 inch baking dish. This is where your cake will come to life. Spread a thin layer of chocolate hazelnut spread on the bottom of the dish. Use a spatula to ensure it covers the entire base evenly. This layer adds a rich flavor and keeps the graham crackers from getting too soggy.
Layering the Ingredients
Now it’s time to build your cake! Start with a layer of graham crackers. Break them as needed to fit snugly in the dish. Make sure they cover the chocolate spread completely. After that, spoon a generous layer of whipped cream over the graham crackers. Smooth it out with your spatula for an even surface.
Next, sprinkle mini marshmallows evenly over the whipped cream. This step adds a fun texture and a sweet bite. Repeat these layers: chocolate hazelnut spread, graham crackers, whipped cream, and mini marshmallows. Keep going until you use all the ingredients. Make sure your final layer is whipped cream for a nice finish.
Once layered, cover the dish with plastic wrap. Refrigerate for at least 4 hours. For the best taste, let it chill overnight. Before serving, remove the wrap and garnish with chocolate chips, crushed graham crackers, and any leftover mini marshmallows. This extra touch makes your dessert look beautiful and appetizing.
Tips & Tricks
How to Achieve Perfect Whipped Cream
To make perfect whipped cream, start with cold tools. Use a chilled bowl and beaters. This helps the cream whip faster. Combine heavy whipping cream, powdered sugar, and vanilla extract in your bowl. Beat on high speed until soft peaks form. Be careful not to overmix. Overwhipping makes the cream grainy. Soft peaks should hold their shape but still be smooth. This cream adds a light texture to your cake.
Best Practices for Layering
Layering is key for a great icebox cake. Start with a thin layer of chocolate hazelnut spread. This acts like glue for the graham crackers. Place the crackers snugly, breaking them if needed. After each layer of graham crackers, add whipped cream. Then sprinkle mini marshmallows for fun. Keep repeating the layers until you use all the ingredients. Finish with whipped cream on top for a beautiful look. Make sure it’s smooth and even. This creates a stunning presentation.
Serving Suggestions for Optimal Enjoyment
For the best taste, chill the cake for at least four hours. Overnight is even better! This allows flavors to blend and the cake to firm up. When serving, cut the cake into squares. You can add a drizzle of chocolate hazelnut spread on top. Garnish with mini chocolate chips and crushed graham crackers. This adds a nice crunch and extra sweetness. Enjoy the delightful mix of flavors and textures!
Pro Tips
- Whipping Cream Consistency: Make sure to whip the heavy cream until it forms soft peaks. Overwhipping can lead to a grainy texture, so stop as soon as you see peaks forming.
- Layering Technique: For the best results, ensure each layer is even and smooth. This not only looks more appealing but also helps the flavors meld together beautifully.
- Chilling Time: Allow the cake to chill overnight for optimal flavor and texture. The longer it sits, the better the layers will set and the flavors will develop.
- Garnishing Tips: Add your garnishes just before serving to maintain their texture and appearance. This keeps the cake looking fresh and inviting.
Variations
Alternative Flavor Combinations
You can change the classic s’mores flavor easily. Try using peanut butter in place of chocolate hazelnut spread. It adds a nutty taste that blends well with marshmallows. You might also swap in caramel sauce for a sweeter twist. Mixing in some crushed cookies adds fun textures, too. Use different kinds of chocolate, like white or dark, to add variety. Each change makes a new treat that still feels familiar.
Gluten-Free and Vegan Options
Making a gluten-free s’mores icebox cake is simple. Use gluten-free graham crackers as a base. For a vegan version, substitute heavy cream with coconut cream. Just chill it first, then whip it until fluffy. You can use maple syrup instead of powdered sugar. For the chocolate spread, pick a dairy-free option. These swaps keep all the flavors but make the dessert friendly for different diets.
Seasonal Twists for Special Occasions
You can make this cake fit any holiday. For summer, add fresh berries like strawberries or raspberries. They bring a bright flavor and color. In fall, try pumpkin spice in the whipped cream for a cozy touch. During winter, add peppermint extract for a refreshing kick. Each season offers its own chance to play with flavors. These fun twists can make your s’mores icebox cake an exciting centerpiece for any gathering.
Storage Info
Best Ways to Store the Cake
To keep your S’mores Icebox Cake fresh, use an airtight container. This helps maintain its smooth texture and yummy flavor. If you don’t have a container, wrap the dish tightly with plastic wrap. Make sure the cake is fully chilled before storing it. This will help prevent moisture from forming.
Freezing Instructions
You can freeze the S’mores Icebox Cake if you want it to last longer. First, cut the cake into squares. This makes it easier to thaw just what you need later. Wrap each piece in plastic wrap, then place them in a freezer-safe bag or container. The cake can stay in the freezer for up to three months. When you’re ready to enjoy it, just thaw it in the fridge overnight.
Shelf Life and Quality Tips
The S’mores Icebox Cake tastes best within three days. After that, it may start to lose its creamy texture. If you have leftovers, keep them in the fridge. Always check for any signs of spoilage, like a change in smell or appearance. Enjoying this cake while it’s fresh is key for the best taste!
FAQs
Can I make this cake in advance?
Yes, you can make this cake in advance. I often prepare it a day prior. This gives the flavors time to blend well. Just cover it tightly with plastic wrap. Store it in the fridge until you’re ready to serve.
What can I use instead of chocolate hazelnut spread?
If you want a change, try using peanut butter. It adds a nutty twist. You could also use regular chocolate spread. Both options work great in this recipe.
How do I prevent the cake from becoming soggy?
To keep your cake from getting soggy, layer the ingredients carefully. Use a thicker layer of chocolate hazelnut spread. This acts as a barrier. Make sure to chill the cake properly. The fridge helps firm up the layers nicely.
This blog post covered how to make a delicious layered cake from start to finish. We discussed key ingredients, step-by-step instructions, and helpful tips for perfecting whipped cream. I shared fun variations and storage tips to keep your cake fresh. Remember, you can customize flavors and even make it gluten-free or vegan. Whether for a special occasion or just for fun, enjoy every bite of your tasty creation. Happy bakin